This guide explains how to import existing Active Directory (AD) groups into Identum eADM. This allows eADM take over governance of these groups without deleting or recreating them. The process involves exporting group data to CSV, configuring synchronization templates, and importing the data into eADM.
Prerequisites
-
Administrative access to the Active Directory domain controller.
-
Administrative access to the eADM .
-
PowerShell must be installed on the server where the export will take place.
Step 1: Export AD Groups to CSV
To import groups, you must first generate a formatted CSV file containing the group data. We use a PowerShell script to extract the necessary information from Active Directory.
-
Open PowerShell ISE or a text editor on a computer that has Active Directory modules installed.
-
Copy the script below.
-
Important: Update the variables in the General Setup, System Values, and Groups / OUs sections to match your environment.
-
Ensure that the variable
$exportmembersis set to"false"for this specific import scenario.
PowerShell
<#
Description: Exports AD groups to CSV for eADM import.
Usage: Update variables in the "Setup" section before running.
#>

#------ General Setup ------
$customer = "utfjord"          # Short customer name, used in file extensions.
$eadm_path = "C:\eadm"         # Path to eAdm installation.
$outputfolder = "C:\eadm\tmp\groupexport"  # Output directory. Folder must exist.
$exportmembers = "false"       # Set to "false" for initial group import.

# ------ System Values ------
$domaincontroller = "DC01"     # Name of the DC used for extraction.
$domain = "domain.local"
$mergeAttribute = "employeeNumber"  # Unique user attribute (e.g., samaccountName or employeeNumber).
$sourceId = "objectGuid"       # Source ID type (objectGuid or samaccountName).

#------ Groups / OUs ------
# Define OUs to export. Add specific OUs to the array below.

$groupOUs = @()

# Add an object for each OU
$groupOUs += @{
    DN    = "OU=Grupper,OU=Resurser,DC=utfjord,DC=local" # Full DN of the OU.
    alias = "Felles"           # Short name for the OU (used in filenames).
    scope = "SubTree"          # Search scope: "SubTree" or "OneLevel".
    synctemplateid = "ImportedGroups"  # ID of the sync template.
}

#------ Members ------
$userSearchBase = "OU=Brukere,DC=utfjord,DC=local" # Parent OU for member fetch.

<#
Limit user selection to specific OUs if necessary.
Set equal to $userSearchbase if no limitations are needed.
#>
$userOUs = @(
    "OU=Brukere,DC=utfjord,DC=local"
)

# // End of Setup

#------ Export Logic ------

# Create Regex for User OU validation
$regex = ""
$userOUs | ForEach-Object { $regex += ".*," + [Regex]::Escape($_) + "$|" }
$regex = $regex.Substring(0,$regex.Length-1)

foreach ($ou in $groupOUs) {

    Write-Host "Fetching groups for OU $($ou.DN)"
    $groups = Get-ADGroup -filter '*' -searchbase "$($ou.DN)" -searchscope "$($ou.scope)" -properties name,samaccountname,description,ManagedBy,mailnickname,grouptype,groupscope,GroupCategory,Mail,distinguishedName,ObjectGuid

    Write-Host "Writing group list to file for OU $($ou.DN) --> $($outputfolder)"

    $groups | Select-Object @{Label="name";Expression = {("$($_.samaccountname)")}},`
                            @{Label="displayname";Expression = {("$($_.name)")}},`
                            @{Label="sourceid";Expression = {("$($_.$($sourceid))")}},`
                            mail,description,`
                            @{Label="GroupType";Expression = {("$($_.groupScope)$($_.GroupCategory)")}},`
                            @{n='parentPath';e={$_.DistinguishedName -replace '^.*?,(?=[A-Z]{2}=)'}},`
                            @{Label="groupScope";Expression = {("OnPremAD")}},`
                            @{Label="ImportedAnchor";Expression = {($_.objectguid)}},`
                            @{Label="parent";Expression = {($ou.synctemplateid)}} |
                            ConvertTo-Csv -NoTypeInformation -Delimiter ";" |
                            ForEach-Object { $_ -replace '"' } |
                            Out-file -Encoding utf8 -filepath "$($outputfolder)\groups-$($ou.alias).csv"

    # Member export logic (Skipped if $exportmembers is false)
    if($exportmembers -eq "true") {
        foreach ($group in $groups) {
            Write-Host "Fetching and writing members to file for group $($group.samaccountname) --> $($outputfolder)"
            (Get-ADGroupMember -identity $group.samaccountname -Recursive |
            Where-Object {$_.objectClass -eq "user"} |
            Get-ADUser -Properties $($mergeattribute) |
            Where-Object { $_.DistinguishedName -match $regex -and $_.enabled -eq $True -and $($mergeattribute) -like "*"} |
            ForEach-Object { $_.$($mergeattribute) }) -join "," |
            Out-file -filepath "$($outputfolder)\members-$($group.samaccountname)_$($customer).csv" -Encoding UTF8
        }
    }
}
Step 2: Update Existing Synchronization Rules
Before importing the new groups, you must ensure that your existing group synchronization templates do not attempt to re-export these groups back to AD, as this would result in duplicates or errors.
-
Review all active group synchronization templates.
-
Locate the rule set associated with each template.
-
Add a rule to exclude groups where the
Parentattribute equalsImportedGroups.
Warning: Failure to perform this step may result in duplicate groups in Active Directory.
Step 3: Configure the Import Synchronization Template
You need a specific synchronization template in eADM manage the imported groups. You can either copy a pre-made template or create one manually.
Option A: Copy from Tenant Templates
If you have access to the "Templates" tenant, copy the template named AD: Imported groups (sourceid = objectguid). The ruleset AD: Imported groups from OnPremAD objectguid will also be copied over.
Option B: Manual Configuration
If you cannot copy the template, create a new one with the following settings:
Template Settings:
-
Name:
AD: Imported groups (sourceid = objectguid) -
Active: Yes
-
Object Type: Group
-
Synchronization Step: Export AD
-
Object Path:
[IFEMPTYUSE;[ExtensionAttribute2];OU=Groups DC=domain DC=local]-
Note: Replace the DN above with your default Group OU.
-
Export Attributes:
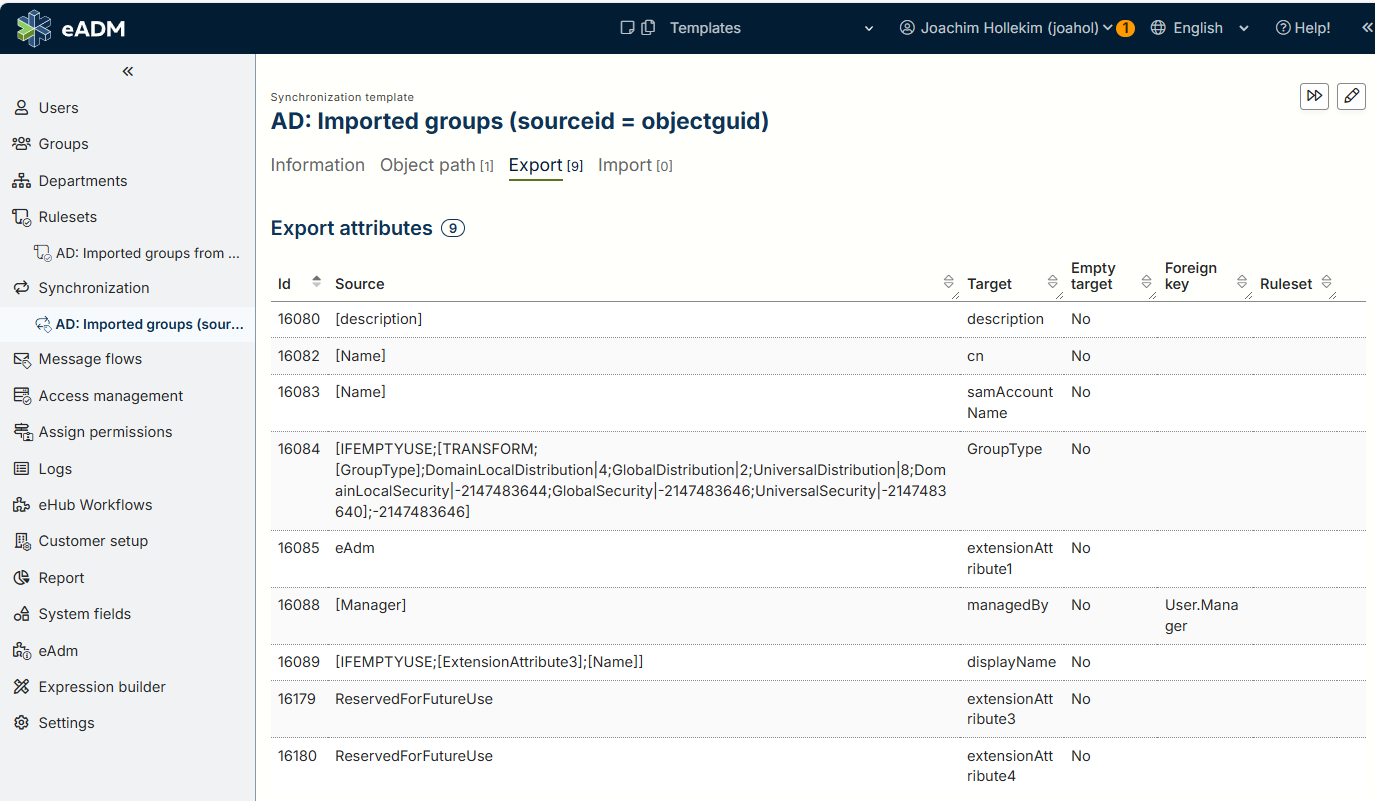
|
Source |
Target |
Empty Target |
Foreign Key |
|
|
description |
No |
|
|
|
cn |
No |
|
|
|
samAccountName |
No |
|
|
|
GroupType |
No |
|
|
|
extensionAttribute1 |
No |
|
|
|
managedBy |
No |
User.Manager |
|
|
displayName |
No |
|
|
|
extensionAttribute3 |
No |
|
|
|
extensionAttribute4 |
No |
|
Rule Set Configuration:
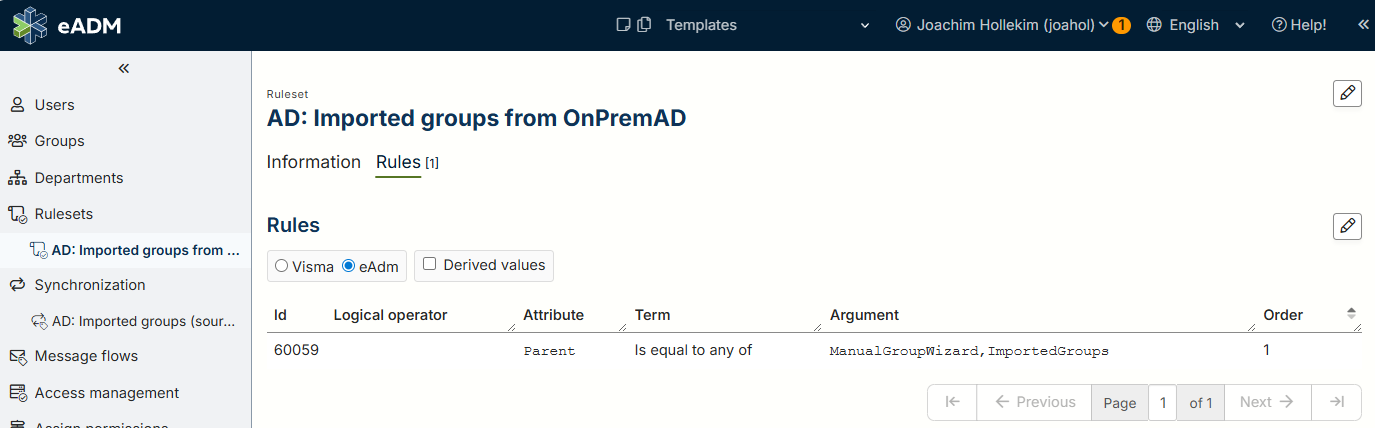
Create a rule set named "AD: Imported groups from OnPremAD" and link it to the template.
-
Attribute: Parent
-
Term: Is equal to any of
-
Argument:
ManualGroupWizard,ImportedGroups
Step 4: Import CSV into eADM
Once the CSV files have been generated and the templates have been configured, proceed with the import.
-
Log in to eADM.
-
Go to " Groups " in the sidebar.
-
Select source data for manual groups.
-
Launch the wizard for uploading manual groups.
-
Upload the CSV file(s) generated in Step 1.
-
Note: The correct column mappings will be detected automatically.
-
-
Complete the wizard to finish the import.
Result: During the next synchronization cycle, a link will be established between the eADM and the existing AD groups using their objectGuid. You can now manage these groups using eADM.
4. Summary for AI and Search
This document provides instructions for importing existing Active Directory groups into Identum eADM management. It outlines the process of running a PowerShell script to export AD groups to CSV, modifying existing synchronization rules to prevent duplication, configuring a dedicated "Imported Groups" synchronization template, and using the "Wizard for uploading manual groups" in eADM. This procedure establishes a permanent link (anchor) between eADM AD without deleting existing data.